
Quick Verdict
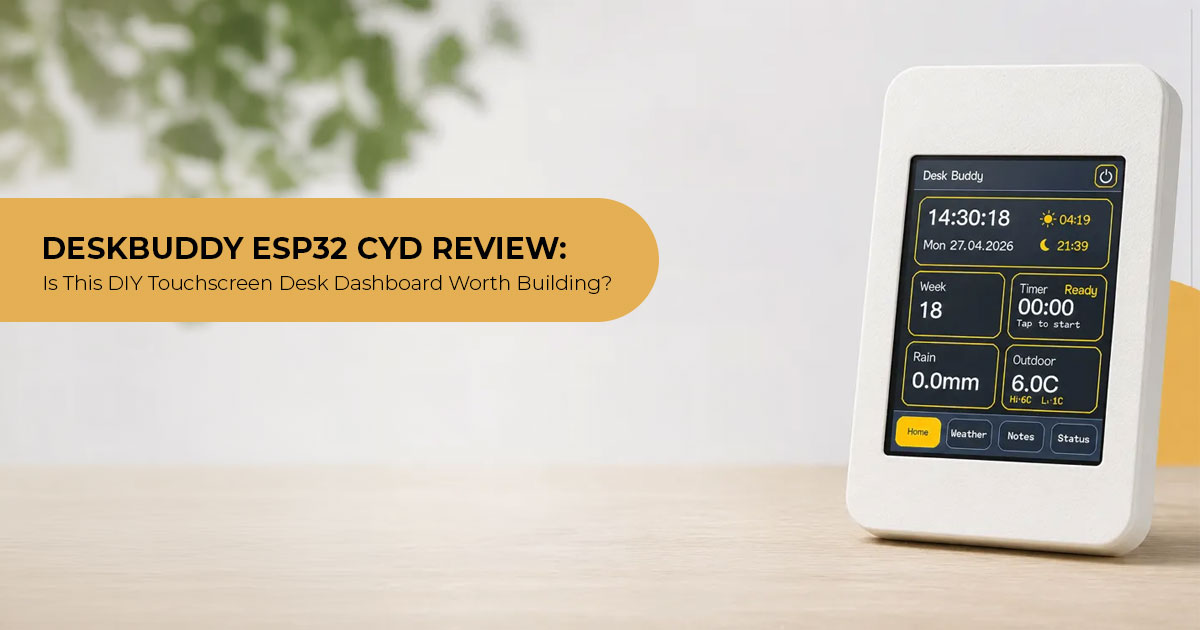
The Deskbuddy is a clean, minimal 3D-printable enclosure built around an ESP32 CYD board to create a personal desk dashboard. If you already own a 3D printer and enjoy working with maker electronics, this project gives you a practical screen for time, weather, notes, and timers without having to unlock your phone.
But there is a bigger question here: does a small DIY screen actually make your desk life easier, or is it just another gadget competing for your attention? That is what makes Deskbuddy interesting.
Instead of adding another app to your phone, it puts useful information where you can see it without opening anything.
It is not a finished retail device, so you will need to handle the 3D printing, assembly, setup, and configuration yourself. For makers, DIY electronics enthusiasts, developers, and tech users who enjoy customizing their workspace, though, that extra effort may be part of the appeal. The open-source design and ongoing development also leave room to change the project around your needs.
Introduction: Why This Project Exists
Think about how often you reach for your phone just to check the time, weather, a reminder, or a timer. You unlock it, check one thing, and there is a good chance something else catches your attention. A message, an email, a notification — and a five-second check turns into several minutes.
Deskbuddy takes a different approach. It keeps the information you need in front of you, on your desk, all the time.
Built around a touchscreen ESP32 board and a two-part 3D-printed enclosure, Deskbuddy works as a small personal desk dashboard. It can show useful information such as time, weather, notes, and timers, while its customizable design gives you the freedom to build it around your own workflow.
That raises an interesting point: sometimes the best desk gadget is not the one that does more, but the one that helps you do less with your phone.
As technology experts with over 20 years of experience in hardware and application research and development, we evaluate products and projects based on real-world performance, durability, usability, and value for money. Our goal is to help you choose what actually makes sense for your needs, whether your priority is budget, performance, reliability, or long-term use.
For makers, DIY electronics enthusiasts, developers, 3D-printing hobbyists, and people looking for a more focused desk setup, we also look at the effort involved. A project can look great on paper, but if it takes too much time to build, configure, or maintain, is it really worth having?
That is the question we want to answer here.
In this review, we examine Deskbuddy’s design, hardware, features, setup, everyday usability, customization options, and overall value. We will also compare it with other desk dashboards and smart displays to see where this DIY project makes sense — and where a ready-made device may be the better choice.
If you have ever wanted a small information screen on your desk without another distracting phone or expensive smart display, keep reading. Deskbuddy may be a much simpler solution than you expect.
Product Overview
What Is Deskbuddy?
Deskbuddy is an open-source maker project created by LextZip. The core concept is straightforward: take a commonly available ESP32 CYD (Cheap Yellow Display) — a 2.8-inch touchscreen development board — and place it inside a clean, rounded enclosure designed for desktop use. The result is a compact, customizable dashboard for your workspace that shows time, weather, notes, timers, and a general status view in a single, always-on display.
The Deskbuddy model files are available on MakerWorld, while the firmware source is hosted on GitHub. It is categorized under the Adafruit #3DThursday series, which highlights DIY electronics integrated with 3D-printed parts.
What We Verified
We cross-checked the main details in this review against the Adafruit source post, the MakerWorld model page, the GitHub repository (LextZip/Deskbuddy), and related competitor documentation. Key facts include:
- The board is the ESP32 CYD, typically the ESP32-2432S028 or ESP32-2432S028R.
- The display size is a 8-inch TFT.
- The enclosure is a two-part print in PLA or PETG.
- Features include clock, weather, notes, timer, focus timer, and status widgets.
- Customization is done through a web interface, not through hard-coded changes.
- The project status is active development.
What Is the ESP32 CYD?
The ESP32 CYD — commonly called the Cheap Yellow Display — is an all-in-one development board that combines an ESP32 microcontroller with a 2.8-inch touchscreen display, touch controller, microSD slot, RGB LED, and light sensor. It is widely used in maker projects because it requires almost no external wiring to get a functional display running.
For the Deskbuddy, this board is the entire computing and display core. The common 2.8-inch CYD configuration used by Deskbuddy has a 240 × 320 display with an ST7789 driver. The current Deskbuddy firmware uses an XPT2046 resistive touch controller, although CYD hardware varies by revision.
If you are considering this build, the board is the single most important purchase. Without it, the enclosure has nothing to display.
Key Features: What Each One Means for You
Clock and Time Display
The clock is the simplest and most frequently used feature. The software allows customization of the time and date format. For users who keep a desktop display specifically to avoid checking their phone, this is the core value. The clock can continue displaying the time after synchronization, while Wi-Fi is used for time synchronization and weather updates.
Weather Display
The weather display pulls live weather data from Open-Meteo over the internet. You configure your location through the browser interface. This is useful for quick morning or work session checks. It requires a stable Wi-Fi connection and an active weather data source. If the connection drops, the widget will not update, though the device itself will continue running. For many users, this may be one of the most useful parts of the dashboard because the weather is visible when they need it.
Notes Panel
The notes panel lets you display short reminders, to-do items, or custom text directly on the screen. This is more useful than it sounds at first. A visible note eliminates the need to open a notes app. It is customizable through the same web setup interface. Together with the clock and timer, the notes panel makes the Deskbuddy useful as a simple everyday workspace companion.
Timer and Focus Timer
The timer features include both a general countdown and a focus timer option. The presets are configurable. For anyone who uses focused work sessions, having the timer visible without navigating to a phone or browser extension is a genuine convenience.
General Desk Status Screen
Beyond specific widgets, the dashboard acts as a desk status screen. It can show multiple widgets at once or focus on a single function. The customization interface allows users to select which widgets appear and how they are arranged.
Design and Build Quality
The 3D Printed Enclosure
The 3D-printed enclosure is a two-part design: a front cover and a back shell. The form is rounded and compact, intended to sit naturally on a desk without taking excessive space. The front shell fits over the board, and the back shell holds it in place. There is a top opening for USB-C access.
The case design is clean rather than decorative. It does not include animated characters or decorative eye shapes like some competitors. The aesthetic is minimal and professional.
Print Requirements and Material
The MakerWorld documentation confirms that the print is simple. It requires minimal support material. Recommended materials are PLA or PETG. A textured build plate is suggested for a clean surface finish. If you already have a 3D printer and basic filament, the material cost for the case is very low.
The fit depends slightly on the exact board version. The source notes that users should verify their exact ESP32 touchscreen version before printing, since board tolerances vary.
Assembly Process
Assembly steps are documented in the source repository and MakerWorld page. The basic process is:
- Print the front and back parts.
- Place the display board into the back shell.
- Attach the front cover after fitting the board.
- Check fitment against the exact board version.
- Upload the firmware, configure Wi-Fi, and customize through the browser interface.
This is a maker-level assembly. It requires basic familiarity with ESP32 flashing, USB connections, 3D printing, and, depending on the board, display configuration. It is not a plug-and-play consumer product.
Display Performance
Screen Quality in Context
The 2.8-inch touchscreen is adequate for short text, numbers, and simple widget layouts. At 240 × 320 pixels, the resolution is not high by modern smartphone standards, but it is sufficient for clock digits, weather icons, and brief notes.
The 2.8-inch display is suited to typical desktop use, although strong glare or bright ambient light may affect visibility.
Touch Response
The current Deskbuddy firmware uses an XPT2046 resistive touch controller. This means touch requires slightly more pressure than a modern capacitive smartphone screen. It is intended for simple taps and widget selection rather than multi-touch gestures like pinch-to-zoom.
Software and Customization
Browser-Based Configuration
One of the stronger points of this project is the customization method. Rather than editing code directly, users configure settings through a web interface. Confirmed customization options include:
- Accent colors and text colors
- Time and date format
- Timer presets
- Weather location
- Custom nickname or title
- Available widgets and dashboard settings
- Notes and reminders
- Alert behavior
This lowers the barrier for users who want customization without rewriting firmware.
Development Status Note
The source clearly states that the project is in active development. This means the feature set may expand, and some behaviors may change with future updates. Readers considering the build should treat the current version as a solid working base rather than a finalized retail product.
Connectivity and Power
USB-C and Wi-Fi
The standard design is powered through USB-C. There is no internal battery in the original Deskbuddy configuration. This keeps the case simpler and avoids battery management in the firmware. Users who want battery operation can look at competitor designs that include rechargeable cells.
Wi-Fi connectivity is required for weather updates and time synchronization. The ESP32 connects to a standard 2.4 GHz network. There is no mention of Ethernet or 5 GHz support in the source materials.
Data and Privacy
Weather data requires sending your configured location coordinates to Open-Meteo. The firmware pulls weather data over the internet. There are no advanced privacy settings mentioned in the documentation. Users concerned about data sharing should review the service’s terms and privacy information.
Real-World Usage Context
Who Benefits Most?
This project makes the most sense for users who already have or are willing to purchase an ESP32 CYD board, have access to a 3D printer, and want a dedicated, always-visible information panel. It is less suitable for people who want an out-of-the-box retail device with warranty and customer support.
In practical terms, the dashboard is particularly suited to these scenarios:
- A focused work session where a visible timer helps maintain concentration.
- A workspace where checking the weather quickly matters.
- A setup where reducing phone interaction is a priority.
- A maker environment where displaying custom notes or status messages is useful.
Limitations to Understand
Because this is an active development project with open-source firmware, there is no conventional retail-style customer support system. Users will mainly rely on the GitHub repository, documentation, issues, and the wider maker community. If the weather API changes, or if a future ESP32 board revision introduces compatibility changes, users must rely on the developer or community for updates.
The enclosure does not include battery storage, so the device must remain near a USB power source. The base design also does not include speakers or audio alerts.
Competitor Context: How Deskbuddy Compares
The maker community has produced several similar projects. Understanding the differences helps clarify whether Deskbuddy is the right choice.
Deskbuddy vs. Desktop Buddy (Printables)
The Desktop Buddy from Printables takes a different approach. It uses a Wemos Lolin D32 board with an ILI9341 display and includes animated eyes, a DHT20 temperature and humidity sensor, alarm clock functions, a stopwatch, and a rechargeable battery. The aesthetic is playful rather than minimal. If you want character animation and built-in environmental sensors, that design may be a better fit. If you prefer a clean, minimal enclosure with broader dashboard customization, Deskbuddy may suit you better.
Deskbuddy vs. CYD Desk Buddy (MakerWorld — annaglyph)
The CYD Desk Buddy by annaglyph is specifically designed for Bambu Lab printer monitoring and Home Assistant dashboards. It offers multiple viewing angles (32°, 45°, and 60°) and supports battery operation. It uses ESPHome firmware rather than custom software. If your primary need is printer monitoring or smart home control, that project is more targeted. Deskbuddy is more general-purpose.
Deskbuddy vs. ESP DeskBuddy (Schematik — ESP32-C6)
The ESP DeskBuddy on Schematik uses the newer ESP32-C6 board with a monochrome display and swipeable pages. It includes weather, stock quotes, and GitHub statistics. The UI is black and white with a face animation. This is a different generation of hardware and a very different visual style. It appeals to users who prefer minimalist monochrome interfaces and newer chipsets.
Deskbuddy vs. GeekMagic-S3 Desk Weather Clock (ESP32-S3)
Tim Schneeb’s weather clock — the GeekMagic-S3 Desk Weather Clock — uses an ESP32-S3 with a 240 × 240 square display and focuses on MQTT integration, remote image display, and web-based configuration. It is more oriented toward smart home integration than personal workspace use. The square form factor is also distinct from Deskbuddy’s rounded desktop design.
Pros and Cons
Strengths
| Strength | Why It Matters |
|---|---|
| Customizable Mini Dashboard with Web-Based Setup | Reduces the need for manual code editing, making configuration accessible to users with basic ESP32 experience. |
| Clean 3D-Printable Enclosure with Simple Construction | Keeps material costs low and makes the enclosure relatively easy to print, reproduce, and replace. |
| Personal Desk Dashboard Focused on Productivity | Provides useful workspace information and tools such as time, weather, notes, and timers in one compact device. |
| Active Development with Open-Source Access | Allows the community to contribute improvements while giving users the freedom to inspect, modify, and customize the code. |
| Uses Widely Available ESP32 CYD Hardware | Replacement boards are generally inexpensive and readily available, helping keep the project accessible and repairable. |
Limitations
| Limitation | What It Means |
|---|---|
| Active development status — not a finished retail product | Features may change over time, and overall stability can depend on continued firmware and software updates. |
| Requires a 3D printer and manual assembly | Less accessible to users who do not own a 3D printer or have the tools and experience required for a DIY build. |
| Standard version is USB-C powered — no battery included | The device must remain connected to a USB-C power source, limiting portable and fully wireless use. |
| Weather features require internet access and a compatible data source | Offline functionality is limited for features that rely on Wi-Fi, including weather information and network-based time synchronization. |
| No conventional retail-style customer support | Troubleshooting primarily depends on the developer, GitHub documentation, issue tracking, and the maker community. |
| 2.8-inch touchscreen resolution is modest by modern standards | Adequate for text, icons, status information, and simple interfaces, but not intended for detailed graphics or video playback. |
Buying Advice and Component Guide
Since Deskbuddy is a DIY build rather than a retail product, the buying decision is really about whether the components are available at reasonable prices and whether the build process matches your skills.
Essential Component: The ESP32 CYD Board
The ESP32 CYD is the core purchase. When selecting a board, verify the version:
- ESP32-2432S028— common 8-inch CYD variant; verify the exact USB interface, display controller, touch controller, and board layout before buying.
- ESP32-2432S028R— common 8-inch CYD variant; check the exact connector, touch controller, and board layout before printing the enclosure.
- ESP32-S3-2432S028— newer ESP32-S3-based variant; only consider it if the board dimensions, display controller, touch hardware, and firmware configuration are confirmed compatible with the Deskbuddy design.
For the standard Deskbuddy design, users should choose a compatible ESP32 CYD 2.8-inch board and confirm its dimensions before printing the case. Some variants have different button, connector, display, or touch configurations.
Filament and Printing
If you already own a 3D printer, the cost is minimal. If you need filament for this specific print, standard PLA or PETG is suitable for the case. The case is small — print time is short, and filament usage is low.
USB Power Supply
A standard USB-C cable and a 5V USB power adapter are sufficient. Most users already have compatible cables from mobile devices. If you want a clean look, a short, right-angle USB-C cable reduces visual clutter.
Where to Find Components
The original project links to AliExpress for board sourcing, but the boards are widely available through electronics retailers. For users in the US and India, ESP32 CYD boards are also available through major online marketplaces. Check the exact display size, board revision, connector, and controller before ordering. We recommend comparing the exact board revision shown in product images against the MakerWorld documentation to avoid compatibility issues.
Pricing Context
The total cost depends on whether you already own a 3D printer and an ESP32 board:
| Component | Estimated Price Range (USD / INR) | Notes |
|---|---|---|
| ESP32 CYD Board | Approx. $8–$15 / ₹700–₹1,300 | Pricing varies depending on the specific board variant, retailer, and seller region. |
| 3D-Printed Case (Filament) | Approx. $1–$3 / ₹90–₹250 | The compact two-part enclosure requires relatively little filament, keeping material costs low. |
| USB-C Cable / Adapter | Approx. $2–$8 / ₹170–₹670 | May add no extra cost if you already have a compatible USB-C cable or power adapter. |
| Total Estimated Build Cost | Approx. $11–$26 / ₹960–₹2,220 | Typically less expensive than a finished desktop smart display, although the final cost depends on board pricing and whether you already have access to a 3D printer. |
Compared to buying a finished desktop smart display, the Deskbuddy is inexpensive. The trade-off is assembly time, firmware setup, and the absence of warranty or customer support.
Who Should Build This?
Recommended For:
- Makers and electronics hobbyists who enjoy assembling and configuring ESP32 projects.
- Users with 3D printers who want a custom workspace accessory at low material cost.
- People focused on reducing phone distractions who want visible time, weather, and reminders
- Readers interested in open-source maker projects with customizable interfaces.
Not Recommended For:
- Users seeking a finished retail product with warranty, support, and plug-and-play setup.
- People without access to a 3D printer or basic ESP32 programming familiarity.
- Users who need battery-powered mobile operation without modifying the design.
- Anyone who expects frequent feature updates with guaranteed backward compatibility — active development carries that risk.
Final Verdict
The Deskbuddy is a practical, well-documented maker project that delivers exactly what it promises: a clean, minimal personal desk dashboard built around the widely available ESP32 CYD. The customizable mini dashboard features — clock, weather display, notes panel, timer functions, and status widgets — address real workspace needs without requiring complex code changes.
The design is not flashy. There are no animated characters or decorative elements. The value is in simplicity and customization. The 3D-printed enclosure is simple to print and compact enough for typical desktop use. The web-based setup lowers the barrier for users who prefer configuration over coding.
Our recommendation: if you have the board, a printer, and the patience to work through initial setup, this is a useful build. Treat it as an active maker project rather than a finished consumer device, and you’ll have a clearer idea of what to expect. The open-source nature means the community can improve it over time, which is both a strength and a consideration.
Recommended Purchase Sections
Check Current Prices — Amazon US
If you are considering the ESP32 touchscreen dashboard build, start by confirming you have the right board. The ESP32 CYD (typically ESP32-2432S028 or ESP32-2432S028R) is the core component.
Look for listings that clearly show the 2.8″ TFT screen and verify the USB connector type matches your setup.
We recommend reviewing current pricing, checking recent buyer reviews for board compatibility notes, and confirming the exact revision before ordering. This ensures the 3D-printable enclosure from the Deskbuddy project will fit without adjustments.
View current ESP32 CYD board offers on Amazon US →
Check Current Prices — Amazon India
For readers in India, the Cheap Yellow Display boards are available through major electronics retailers. Confirm whether the listing shows the ESP32-2432S028 or ESP32-2432S028R variant, and check that the display resolution matches the standard 240 × 320 specification used in this project. A compatible board ensures your personal desk dashboard build proceeds smoothly.
View current ESP32 CYD board offers on Amazon India →
What Do You Think?
Have you built something similar to Deskbuddy, or would you actually use a DIY desk dashboard in your workspace? Tell us what you think in the comments.
If you found this review useful, follow us for more hardware reviews, DIY projects, buying guides, and practical tech content. And if you have any questions about Deskbuddy, the ESP32 CYD board, 3D printing, setup, or its features, feel free to ask. We’ll do our best to help.
***Disclaimer***
This blog post reflects our research, analysis, and opinions based on available product information, user feedback, and industry knowledge. It should not be taken as the official position of any brand, manufacturer, or company mentioned here. We make every effort to keep this guide accurate, but product specifications, pricing, and availability may change after publication. We recommend double-checking important details before making a purchase.
Some links in this article may be affiliate links. If you choose to buy through these links, we may earn a small commission at no extra cost to you. This helps support our work and allows us to keep publishing in-depth, unbiased reviews. Affiliate partnerships never influence our recommendations.
Opinions expressed by readers are their own and do not necessarily reflect ours. We are not responsible for outcomes resulting from the use of information on this site. Please seek professional advice where appropriate.
All product names, logos, and brands mentioned are the property of their respective owners. These names are used for identification and informational purposes only and do not imply endorsement.